I've been branching out over the past couple of months - into small format sculpture! I have a plan to do resin cast sculptures based on my MechEgg range of drawings, but before I started I thought I should play with wax and clay first.
Not having done any clay work since Play Doh days as a child it has been a learning experience. I found that wax was self-supporting but really difficult to see detail with as it is slightly translucent and quite reflective. Then I bought some Staedtler Mars FIMO Air Basic - an air dry clay, and had a go at doing a statuette of my nephew's dog, Hugo.

This is Hugo - a lovely tempered rescue dog of mixed parentage
Steep learning curve... as after a slumping failed first attempt I realized I needed to build up an armature in wire and foil or Styrofoam. Luckily I had some copper 20 gauge wire handy and I raided the kitchen for alfoil. After sketching a plan and taking measurements I created an armature with those materials:

Step one: planning and armature. You can see the planning sketch slightly at the bottom of the paper. Also the back of my first wax sculpture attempt of Riley.

Step Two: Additional bulk added to create a firmer base to lay on clay.
Next I began to lay on clay, forming and building up the form of the dog. I did not worry about surface texture at this time, concentrating on the shape. Once I was satisfied I set it aside to dry. It takes a good 24 hours to dry this clay and for thick areas of clay it can take even longer - several days.
Step 3: Clay build up. Waiting for Hugo to dry out a bit....
After a good 24 hours of drying time I then scored the dry surface, added some clay slip and then proceeded to build up with wet clay furry textures. This took a bit of work as Hugo has a huge fluffy tail and ears. And as Hugo often wears a neckerchief, I added that as well. Now I had to wait another 24-36 hours for him to fully dry, inside and out.

Step Four: Finished unpainted model of Hugo
I debated keeping Hugo in the white clay and just sealing that as is - but he has such distinctive markings and as this was an experimental project I decided to paint and varnish him. MORE online research! Again, luckily I had some Liquidtex Acrylic paint available and could cheerfully paint away taking care to place his white markings correctly. I did try painting in eyes, but that made him look like a zombie dog so I just left the eye hollows instead. Once the acrylic paint had dried (ANOTHER 24 hours!) I then varnished him first with Krylon Spray Gloss varnish to get it into all those nooks and crannies... waited 12 hours.... and top coated with FIMO varnish.
Apart from all that waiting time it was a lot of fun and for my first attempt I am fairly happy.

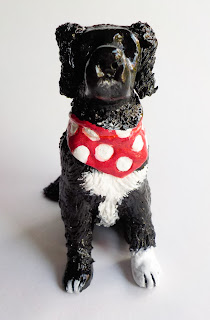


Hugo complete, painted and varnished. He stands about 10cm high. Although he is free-standing I do have a slice of wood he will sit on... currently being varnished... sigh, more drying time....
﹏﹏﹏﹏﹏﹏
And sorry I forgot to post earlier, but this week's prompt is Squash! The Inktober team have taken that to mean a type of pumpkin, but I have another idea or two. You can see some of their work here: Squash


No comments:
Post a Comment